

You can start a new table by clicking on the WebTable icon on
the iconbar. This leads to a window allowing you to choose the
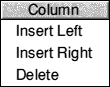
starting dimensions for the table. You can insert and delete
rows and columns from within the main editor, so this need only
be a rough approximation to the size of table. Obviously you
should choose a size which corresponds pretty closely to your final
layout, as this will make the table far easier to handle.
From left to right, the icons on the toolbar correspond to the following
actions:
If your table contains images, or links to ther documents, WebTable will
give you the option of using an external file to preview from, stored in
the same directory as the main table. This will allow the images to
appear correctly, and links to function normally. An external file is
used because tables may form part of a larger page. It would be unwise
for WebTable to save the table automatically, in case other data was
lost.
If you choose for WebTable not to use the external files, a temporary
scrap file will be used as normal, but images and links won't appear/work
correctly.
You can choose to set the preview method as the default for that table
by clicking on the appropriate button in that window.
To select a range of cells, simply click once in the start cell, and then
click once with the right mouse button in the finishing cell. The software
will handle any combination of start and finishing cells, so don't worry if
the start cell isn't the top left of those you are selecting! WebTable will
automatically adjust the range if it includes joined cells which would
otherwise protrude from the selected region, as not doing so could cause
unpredictable results, especially in the case of cell joining!
HTML has no concept of size when it comes to table cells. With traditional
DTP software, you would specify the cell size in centimetres or inches on
a cell-by-cell basis. In HTML cell size is adjusted based on the length
of the cell content, the surrounding cells, and the width of the viewing
window. To simplify this rather complex situation, if you assume every
cell to be the same size, you can't go far wrong, although obviously some
colums will end up slightly wider than others (and some rows deeper).
WebTable shows all the cells with a fixed width, but obviously the content
can be much greater than this, as the Web Browser will adjust the formatting
to suit. The large cell below the toolbar can be used to edit a cell's
content if it is larger than the standard cell size. If you click on any
cell, its content will be displayed in this large editing field.
To add an image to your table, simply drag it into the cell you wish to
include it in. Note that WebTable allows you to mix text and images in
cells. If you drag in a sprite or a draw file, you will have the option
of converting it into any of the WWW graphics formats supported by the
ImageConv utility.
After any conversion has taken place, the Image Setup window will open
with the image's details filled in. Provided you have saved your table,
the correct relative path for the image will be added as well. Clicking
on OK will insert the image tag into the cell you dropped it into.
Alternatively, if you wish to add an image to the current cell, simply
click on the image button on the toolbar to reach the Image Setup window.
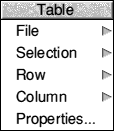
Most of the menu options are self explanatory. The Save Table option just
saves the raw HTML for a table, whereas the Create WWW Page option actually
adds all the HTML headers and footers required to turn your table into a
fully fledged HTML page.
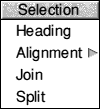
The selection menu is simple enough. Not that even if it isn't highlighted,
the cell with the caret in is always regarded as being 'selected'.
Row alignment probably warrants an explanation. This is a neat HTML tabling
trick which allows you to specify the alignment of all the cells in a row
individually. Because of the way HTML works, with tables being defined as
a series of rows each containing several bits of data, only rows can be
aligned in this way. Anyway, by specifying the alignment for the whole row,
the alignment is only included in the HTML once per row, producing much
neater and more compact code. This is good news for people looking at your
page!
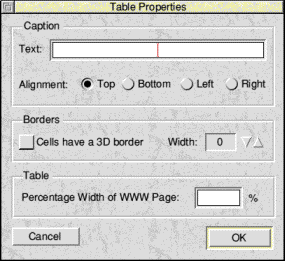
Your HTML table can have a caption which describes its contents. You can
choose its position, but bear in mind that not every browser which supports
tables necessarily supports table captioning. That said, Fresco for RiscOS,
and both Nestscape Navigator™ and MS Internet Explorer™ all
support captioning.
You can also specify whether the table cells have a 3D border or not.
This can only be set on a 'global' scale, and not for individual cells -
another HTML limitation. You can only have a 3D border or none at all. If
you select to have a border, but leave the width at 0, the browser will
determine a suitable width itself.
Finally, by specifying the percentage width of the WWW browser display which
your table will take up, it is possible to avoid the idiosyncracies of certain
browsers when it comes to table formatting. If you've had problems with cells
running to two lines, but the table only occupies about half the browser
display, choose a percentage with here!
You can load existing tables by dragging them over the WebTable icon on the
iconbar, but there is no gaurantee that tables not created by either WebTable or
HTMLEdit will be readable. This is because HTML is such a 'fluid' language, and
there are many bad examples of tables out there, which may miss important tags,
or do slightly strange things to achieve certain effects. Please remember that
WebTable is NOT a Web Browser, but a visual editor for tables, hence the preview
options!